How to build modules in Copr
In this article, I am going to explain the two ways how you can build modules in Copr. Hopefully, it will be interesting for both experienced users, which can submit their perfectly tailored modulemd file and build a module from it, as well as for beginners which could appreciate building modules without having to know anything about modulemd files.
First, let’s take a quick look back. Copr supported modularity features for a quite long time, but they have always been declared as experimental because the modularity upstream was changing so insanely fast. If you’ve been trying to build some modules in the past and found it too slow, complicated, non-intuitive or it didn’t even work at the time, please give it another try. We have totally reworked (simplified) the module build pipeline and significantly reduced the room for errors.
Don’t write a modulemd
There can be various of reasons why you might not want to create a modulemd yaml file. You might be a complete beginner that needs to learn how to write them in the first place, or you might just be lazy to write it from scratch. Luckily we have a solution that requires just a three clicks of the mouse. Am I over-exaggerating? No, not at all, …
Open your project, click on , then click to . It looks like this
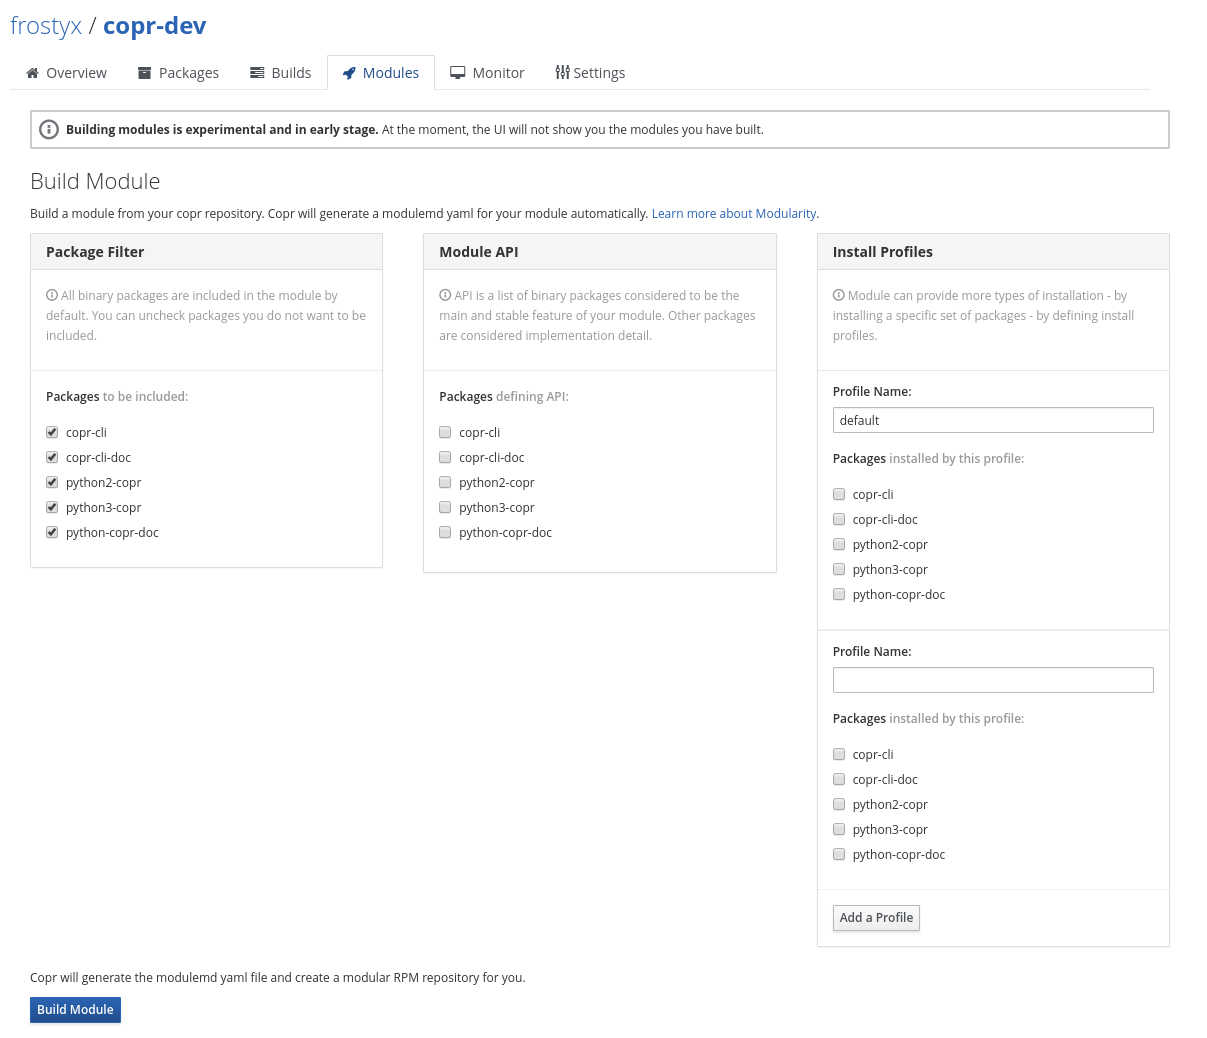
You can see the list of all successfully built packages in the project. By default, they are all selected to become the part of the module, but of course, you can uncheck any of them. You can also specify the module API or its profiles. Then submit the build and it is done.
CLI
Are you a pro who likes to write modulemd files manually? By no means, we don’t want to complicate your workflow. You can submit a build from an existing modulemd yaml stored on both your system or public repository.
# You need a copr-cli-1.67 and python3-copr-1.86 for this
copr-cli build-module --yaml ~/path/to/your/testmodule.yaml
copr-cli build-module --url http://example.com/path/testmodule.yaml
Install module from Copr
Let’s do a complete example together to see how can we install modules from Copr.
# Create a new project or use an existing one
$ copr-cli create testmodule --chroot fedora-rawhide-x86_64
New project was successfully created.

# We can borrow modules/httpd for this example
$ copr-cli build-module --url https://src.fedoraproject.org/modules/httpd/raw/2.4/f/httpd.yaml testmodule
Created module httpd-master-20180118000705
To be able to install modules in your system, you need the DNF with modularity features. For this demo, I will borrow @asamalik’s container in which the DNF is preinstalled.
$ docker run --rm -it asamalik/modularity-hybrid-demo
Now we can navigate to our testmodule project, see Modules and then the detail of our httpd-master-20180118000705. Once the module is successfully built, we can see the guide in “How to use” section and repofiles in it. Download the fedora into /etc/yum.repos.d. Now we can see the module available in our system and be able to install it.
[root@38f31f452b83 ~]# dnf module list
Copr modules repo for frostyx/testmodule/httpd-master-20180118000705
Name                   Stream                   Version                     Profiles
httpd                  master                   20180118000705              default

[root@38f31f452b83 ~]# dnf module info httpd:master
Name        : httpd
Stream      : master
Version     : 20180118000705
...

[root@38f31f452b83 ~]# dnf module install httpd:master/default
...
Hope you like it, please leave your thoughts in the comments section below, or on our mailing list.